
شرح ماهو Relative Layout في تصميم واجهات تطبيقات الاندرويد بالتفصيل - الجزء الثاني

السلام عليكم ورحمة الله ورحمة الله
درسنا في السابق ماهو Relative layout وذكرنا انه يقوم بترتيب العناصر التي بداخله بشكل علائقي
وسنشرح الان كيفية ترتيب العناصر بشكل علائقي مع العناصر التي بجانبه بداخل Relative layout
ويتم ذلك بالخصائص التالية:
حيث يتم في الخصائص ترتيب العناصر فيما بينها باستخدام الـ id لكل عنصر بداخل الـ relative Layout.
قد يبدو الأمر معقد لك.. لكن سنقوم بشرحه بالتفصيل ويتم ذلك بالخصائص التالية:-
1 2 3 4 | android:layout_below="id of View" android:layout_above="id of View" android:layout_toRightOf="id of View" android:layout_toLeftOf="id of View" |
الخاص بالعنصر id حيث يتم إسناد الـ
وسنقوم الان بشرح تلك الخصائص بالتفصيل.
وسنقوم الان بشرح تلك الخصائص بالتفصيل.
لنفترض ان لدينا Relative layout ويوجد بداخله button وtextview كما في الكود ادناه :-
وسنشرح الان كيفية ترتيب العناصر بطريقة علائيقية فيما بينها البين باستخدام الخواص المذكورة اعلاه:
1 2 3 4 5 6 7 8 9 10 11 12 13 14 15 16 17 18 19 20 21 22 23 24 25 26 27 28 29 30 | <RelativeLayout xmlns:android="http://schemas.android.com/apk/res/android" xmlns:tools="http://schemas.android.com/tools" android:layout_width="match_parent" android:layout_height="match_parent" android:background="#ffbb00" tools:context=".MainActivity" > <Button android:id="@+id/button1" android:layout_width="wrap_content" android:layout_height="wrap_content" android:background="#11aa33" android:text="Button" android:layout_centerInParent="true" android:textSize="22sp" /> <TextView android:layout_width="wrap_content" android:layout_height="wrap_content" android:textSize="22sp" android:background="#ffccaa" android:layout_toRightOf="@id/button1" android:layout_centerVertical="true" android:id="@+id/txt" android:text="@string/hello_world" /> </RelativeLayout> |
وسنشرح الان كيفية ترتيب العناصر بطريقة علائيقية فيما بينها البين باستخدام الخواص المذكورة اعلاه:
1- android:layout_below="@id/button1"
وفي هذه الخاصية تقوم بوضع العنصر تحت العنصر الاخر
كما في الصورة ادناه :-

نلاحظ انه تم وضع textview تحت الزر وذلك باستخدام الخاصية كما في الكود ادناه:-
1 2 3 4 5 6 7 8 9 10 11 12 13 14 15 16 17 18 19 20 | <Button android:id="@+id/button1" android:layout_width="wrap_content" android:layout_height="wrap_content" android:background="#11aa33" android:text="Button" android:layout_centerInParent="true" android:textSize="22sp" /> <TextView android:layout_width="wrap_content" android:layout_height="wrap_content" android:textSize="22sp" android:background="#ffccaa" android:layout_below="@id/button1" android:layout_centerVertical="true" android:id="@+id/txt" android:text="@string/hello_world" /> |
2-android:layout_above="@id/button1"
كما في الصورة ادناه :-


نلاحظ انه تم وضع textview فوق الزر وذلك باستخدام الخاصية كما في الكود ادناه:-
1 2 3 4 5 6 7 8 9 10 11 12 13 14 15 16 17 18 19 20 | <Button android:id="@+id/button1" android:layout_width="wrap_content" android:layout_height="wrap_content" android:background="#11aa33" android:text="Button" android:layout_centerInParent="true" android:textSize="22sp" /> <TextView android:layout_width="wrap_content" android:layout_height="wrap_content" android:textSize="22sp" android:background="#ffccaa" android:layout_above="@id/button1" android:layout_centerVertical="true" android:id="@+id/txt" android:text="@string/hello_world" /> |
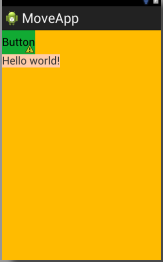
3- android:layout_toRightOf="@id/button1"
وفي هذه الخاصية تقوم بوضع العنصر في الجهة اليمنى للعنصر الاخر
كما في الصورة ادناه :-


نلاحظ انه تم وضع textview بجانب الزر من جهة اليمين وذلك باستخدام الخاصية كما في الكود ادناه:-
1 2 3 4 5 6 7 8 9 10 11 12 13 14 15 16 17 18 19 20 | <Button android:id="@+id/button1" android:layout_width="wrap_content" android:layout_height="wrap_content" android:background="#11aa33" android:text="Button" android:layout_centerInParent="true" android:textSize="22sp" /> <TextView android:layout_width="wrap_content" android:layout_height="wrap_content" android:textSize="22sp" android:background="#ffccaa" android:layout_toRightOf="@id/button1" android:layout_centerVertical="true" android:id="@+id/txt" android:text="@string/hello_world" /> |
4- android:layout_toLeftOf="@id/button1"
وفي هذه الخاصية تقوم بوضع العنصر في الجهة اليسرى للعنصر الاخر
كما في الصورة ادناه :-


نلاحظ انه تم وضع textview بجانب الزر من جهة اليسار وذلك باستخدام الخاصية كما في الكود ادناه:-
1 2 3 4 5 6 7 8 9 10 11 12 13 14 15 16 17 18 19 20 | <Button android:id="@+id/button1" android:layout_width="wrap_content" android:layout_height="wrap_content" android:background="#11aa33" android:text="Button" android:layout_centerInParent="true" android:textSize="22sp" /> <TextView android:layout_width="wrap_content" android:layout_height="wrap_content" android:textSize="22sp" android:background="#ffccaa" android:layout_above="@id/button1" android:layout_centerVertical="true" android:id="@+id/txt" android:text="@string/hello_world" /> |
وهكذا نكون وصلنا إلى نهاية الدرس رأيكم يهمني بالتعليقات.